
Feast for Odin: House of Bricks, A 192 Point Solo (Norwegians; no Emigration; moderate Exploration; Risk and Pillaging-lite; Animal, Crafting, and Building heavy)
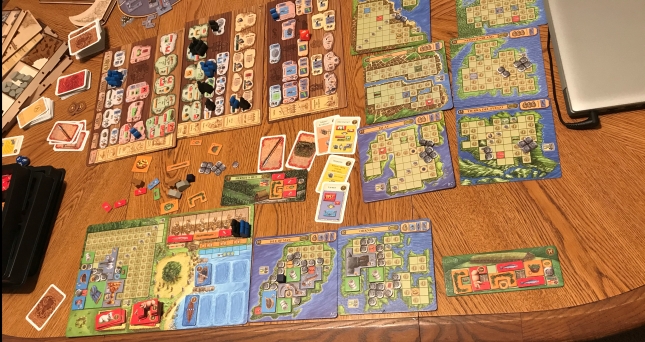
Due to my endgame picture, which shows a preponderance of longhouses and pigs (as well as other animals), my starting occupation card (Master Bricklayer), and artisan shed (The Hermit’s Hut, obviously named after someone who likes to hole up in their house), I dubbed this solo “House of Bricks,” after the house of the wisest of the Three Little Pigs.
I should say that a little of this is postmortem analysis, in that my memory of what I did isn’t crystal clear. Often I’m setting up this game relatively late, after lots of writing. But I would say the following is a 95% accurate interpretation of my post-round photos. I’ve been snapping pics after the end of every round in recent solos, from the feeling that I have something to share with people who A) feel stuck in a rut of going from risk spaces to upgrade spots, or B) want to refine a risk-free crafting/animal strategy to be competitive with pillaging/raiding/whaling. While I did a few risk spots (Fishing and Theft in round 5; Pillaging in round 6), by then I had activated my weapon card bonus on Orkney in order to make two of these actions more or less risk free, only feeling that I was taking a gamble in my round 6 pillaging action.
Not that I rested my game entirely on crafting and weekly market action spaces, as you can see that I do a bit of Exploration–a bit less than usual, as I’ve wanted to work on my house game–and Building, in which I unlock as many bonus squares as possible on islands and longhouses, and use these action-free engines to generate VP.
Set-Up:
Weapon cards: sword, spear, net, bow.
Harvest: Pea, Bean, Flax, Mead horn.
Starting occupation card: Master Bricklayer.
Artisan Shed: The Hermit’s Hut / Icehouse. (You can find my analysis of Artisan Sheds through this link.)
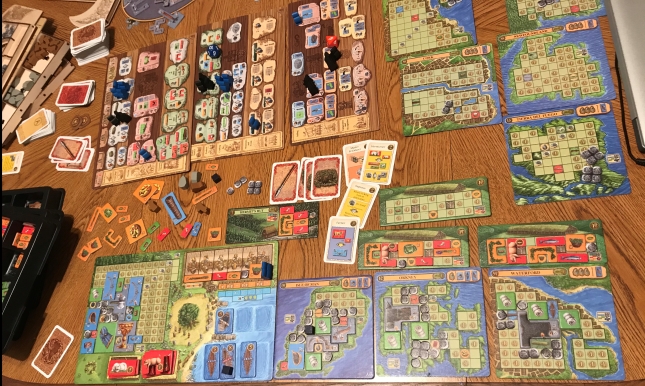
The two starting mountain strips included the long strip from Norwegians, as I wished to contribute to a survey on Board Game Geek posted by the expansion designer, Gernot Kopke, who wondered how it would impact games to play this strip first. This is a bit of a change for me, as while the Norwegians rules advise shuffling it in, so that it could come out in any round, previously in the Board Game Geek forums the designer advised to place it on the bottom of the mountain strips stack, so that it arrives in the last round, and this is the way that I usually set up solos, as well as multiplayer games. It did impact round 4 a bit, when I took the two paired ore one the 1 resource / upgrade 1 Viking action space, and used one for crafting, and one on a crucial square on Isle of Man that let me fill in most of the island, all of its income, and go on after income phase to unlock the pig bonus.
Round One:
1 Viking: Mountain Strip, 2 lumber
1 Viking: Build Artisan Shed (-1 lumber, The Hermit’s Hut)
2 Vikings: Craft Chest (-1 lumber, 4-blue, +1 hacksilver)
2 Vikings: Weekly Market (herb, +1 hacksilver, mead horn) + Play Occupation Card (Master Bricklayer, -1 Stone when Building Houses)
The chest went on my homeboard, unlocking 2 income; the herb, two mead horns, and my pea went in my hut, unlocking the herb bonus and 1 income. My feast was flax/hacksilver/bean.
Income: 3. Between income, feast, and Viking actions, I have 4 hacksilver going into round 2. My only bonus was an herb.
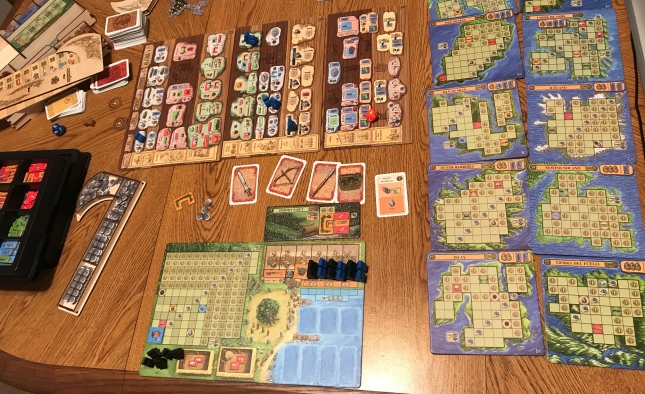
Things I might have done: 1) as I didn’t end up building a house until round 5, I could have played Master Bricklayer later. I chose to pass on another action–such as a risk action, like fishing–because vikings are worth more later in the game, and I definitely wanted to get this card into play. Master Bricklayer is one of the better “unbanned” starting occupation cards. I was considering fishing to fill my hut, and then taking the whaling ship + exploration board action on the fifth column instead, which is a great action saver. Overall, though, I was happy with my opener, as 3 income, 4 hacksilver going into round 2, an herb bonus, and my starting occupation card in play, is a pretty strong start.
Round 2:
Usually, I like to play animals in Norwegians, perhaps because I did so much whaling and pillaging in the base game. However, for my last half-dozen solo games, I’ve been changing it up, going heavy crafting or knarr market strategies, in order to keep my interest in the animal strategy fresh, but in this game I decided to return to animals at last. This ended up paying off extremely well, due to a lucky occupation card draw.
Harvest: Pea, Bean, Flax, Grain.
Weapon Card: + 1 spear. So I have Sword, Spear x2, Bow, Net.
3 Vikings: Buy 2 Sheep (-2 Hacksilver, -1 Bean). I drew Inspector! A super great card, especially to draw so early in the game, when I actually had hacksilver to use it! Because while Inspector is free to play, returning one viking from the game board to your home board, if you have 1 hacksilver per round, you can double its effect, returning two vikings to your pool.
4 Vikings: Weekly Market (Spice, Wool, 1 hacksilver) + Occupation card play (Inspector, detailed above, -2 Hacksilver, +2 Vikings returned to home board).
At this point, I had one hacksilver remaining, and it occured to me that if I got a lumber, I could hit the Whaling Ship + Occupation Board action space in column five.
1 Viking: 1 lumber + 1 upgrade (upgrading herb to pig, so that next time I hit the 4 Viking Weekly Market, I would get the 4-red tile as well).
1 Viking: Whaling Ship + Occupation Board (-1 lumber, -1 hacksilver). I took Isle of Man.
As you can see, I placed my spice and my wool on Isle of Man, unlocking 2 more income and the mead horn bonus. My new income was 5, but as my feast was grain/hacksilver/pea, I only had 4 hacksilver going into round 3. At this point, my bonuses were mead horn, herb. My tile collection was: 2 herbs, flax, mead horn.
Animal Breeding: one of my sheep flips.
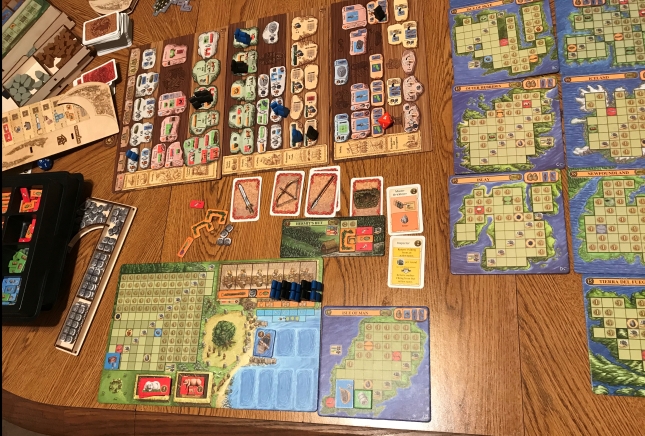
Round 3:
Harvest: none.
Weapon cards: sword, bow, spear x2, net x2.
3 Vikings: Weekly Market (2 wool, 1 fruit basket). Occupation card: I drew Hornblower, which will work great with my then-plan to fill Isle of Man.
At this point, I wanted to hit the 3 Viking ore crafting space, and needed ore. I hate going to the Mountain Strips, but there was an ore and two hacksilver sitting there.
1 Viking: Mountain Strip (+1 ore, +2 hacksilver)
3 Vikings: Craft Ore. I usually draw my occupation card before I pick a special tile, as sometimes your plans change, and this was one of those times. I drew Farmer (it gives you an anytime action by which you can trade a cow for an 8-blue jewelry tile, an awesome VP engine for later in the game), which changed my whole game plan. Instead of filling Isle of Man, I decided to grab Orkney. So I took the large armor suit from the ore crafting space, which works great with that exploration board.
1 Viking: Explore 1 Viking island, taking Orkney.
At this point I had six hacksilver, two wool, and the armor suit, five of which I laid underneath the middle island piece, and one of which I put on Isle of Man, to unlock another income. This gave me 3 income from Isle of Man, 3 income from Orkney, and 9 income total. Six of these were used to unlock the cow bonus on Orkney, so I would get the full benefit from Farmer later on. (Not that I intended to use it until round 6, after my initial pair of cows would have a chance to breed in round 5.) I had 3 hacksilver left over going into round 4. My feast was herb, mead horn, flax. Bonuses: herb, mead horn, cow. My tiles going into round 4 were two herbs, a mead horn, and a fruit basket, not to mention my cow, my pig, and now three sheep, as my flipped sheep reproduced this round in the animal breeding phase.
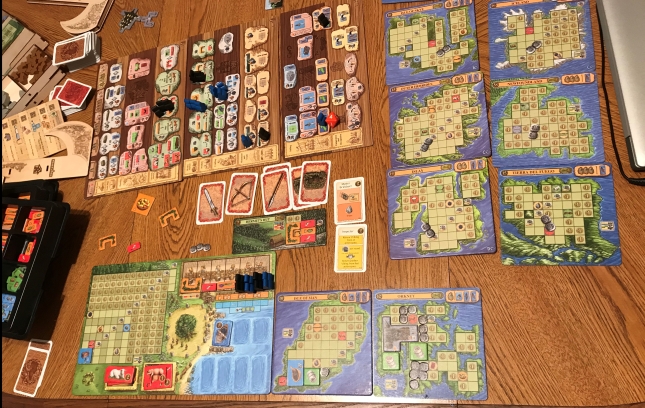
Round 4:
Harvest: pea, bean, flax, grain, cabbage.
Weapon cards: sword, bow x2, spear x2, net x3.
4 Vikings: Weekly Market (+1 hacksilver, spice, wool, 4-red meat, herb) + Occupation card play. I played Hornblower (-1 sheep and -3 hacksilver, but yielding a pelt, another wool, another 4-red meat, and the horn special tile). I had three hacksilver going into this round, so after this action space I had one.
1 Viking: Craft Flax to Linen.
2 Vikings: Craft Linen and Pelt to Jacket + 2 Hacksilver.
At this point, I didn’t really know what to do, and was regretting not starting my ore bonus on my home board, so I could do the ore crafting on the fifth column. I also wanted to get pig breeding started.
1 Viking: Mountain Strip, taking the two paired ore at the end of the Norwegians mountain strip, and upgrading another herb to a pig, giving me my breeding pair.
1 Viking: Craft Ore >9, taking the sickle. The sickle is such a great piece! It’s great for unlocking nearly any bonus.
This was an excellent round, giving me a heap of tiles to lay on my boards, and letting me start on my home board. However, I only had three hacksilver and one ore to fill in around these tiles. This meant that I could either choose between unlocking a little income on my home board, or a lot on Isle of Man, so I chose the latter, by placing the three hacksilver, the ore, the sickle, one of the wool, and the horn, unlocking 6 income there. This gave me 13 income, 4 of which I used to unlock my pig bonus (so now I was making two pigs a round!); 5 of which went on my home board, so that I could lay the jacket, the spice, and the wool, unlocking 3 income for next round, as well as a mead horn, a lumber, and an ore bonus; and three of which I used to unlock my weapon card bonus on Orkney. While I wasn’t doing a lot of risk actions yet, I didn’t need the hacksilver the following round, couldn’t unlock any other bonuses, and thought I might luck into some swords for late game pillaging/raiding. This left me one hacksilver going into round 5. My total bonuses were now: 1 lumber, 2 stone, 1 ore, two mead horns, 1 pig, 1 cow, and 1 weapon card. I now had a breeding pair of cows, but as breeding comes before bonus phase, they didn’t have a chance to breed this round. However, I now had 4 pigs and one of my sheep flipped. My feast was an herb, one 4-red meat, and a pea. My tile collection: fruit basket, herb, two mead horns, grain, bean, cabbage. At this point, I feared I was overproducing food, but wanted to keep it going, as my plan was to start getting some use out of my Master Bricklayer.
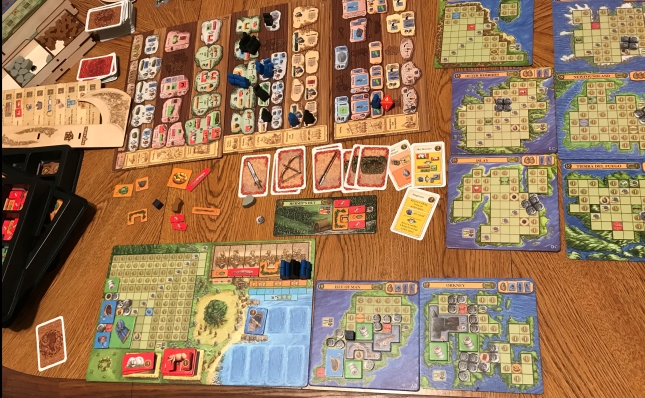
Round 5.
Harvest: none.
Weapon card: At this point, I can’t remember, and my picture was taken after the round, during which I did not only Fishing, but Theft, and spent most of my stash of cards. What I can say is that I had 9 weapon cards after my weapon card draw this round, and spent all but one of my cards, ending the round with a spear and a net (one of which was from my Orkney weapon card bonus).
At this point, I really wanted to get some use out of Master Bricklayer, plus I wanted to make some use out of my weapon cards. I also wanted to chip away the rest of the blanks from the home board. While I would want a longship next round to take Waterford or Newfoundland, I decided to go knarr/longhouse rather than longship/stone house. I don’t like stone houses that much. I see how they can be a great engine builder early in the game, making three points a round from the pelts, but in the late game, they’re a pain to fill, as they have an odd shape, making the negatives harder to cover than the ones in long houses.
The problem was that I only had one lumber and one stone, and even with Master Bricklayer, I needed another lumber. So back to the Mountain Strips again.
1 Viking: Mountain Strips (+2 lumber).
4 Vikings: Build Knarr/Longhouse (-2 lumber, -1 stone due to Master Bricklayer), play occupation card. I played Farmer. While this unlocked the anytime action, I wasn’t to use it for a little while.
3 Vikings: Craft Ore. I took the axe (the 9-square special tile). I think I drew one of the occupation cards I exchanged for a VP chip here. I don’t remember what it was. I only remember I didn’t want to play it on the Theft action space.
1 Viking: Fishing. While I wanted to have a great show on theft, I also wanted to get some use out of my long house. Plus, I had some nets, which you can’t use on Theft. I think I rolled a 2 here, and spent two nets. +2 fish, +1 oil barrel.
1 Viking: Theft. I scored the chalice (the special tile covering 10 squares).
Feast: grain, meat, mead horn.
Placing the hacksilver, the chalice, and the axe, I unlocked 5 income on my home board, which gave me a new income of 16, another of which I placed with the oil barrel to unlock my rune stone bonus on my home board; 5 of which I placed to unlock my grain bonus on Isle of Man; and, one of which I placed to unlock my pea bonus in my longhouse. This left me 9 hacksilver going into round 6. Having also placed two herbs, a pig, the two fish, and a bean in the longhouse, this added an oil barrel, a bean, and a pea bonus. My total bonuses at this point were 1 lumber, 2 stone, 1 ore, 2 mead horns, 1 rune stone, 1 grain, 1 pig, 1 cow, 1 weapon card, 1 oil barrel, one pea, and one bean. My tile collection was now up to 3 mead horns, 1 rune stone, one oil barrel, a cabbage, an herb, a grain, a pea, a bean, and a fruit basket. And look at all that stone and lumber! I could have hit the 4 viking Build action space again in round 6, if I didn’t just block myself due to the solo rules of Feast for Odin. In the stables, my sheep flipped, taking me to three sheep; I got two more pigs, but as one went in the long house, this took me to five total; and, one of my cows flipped at last, plus I got another one from Orkney, taking me to three total, one of them pregnant.
Round 6
Harvest: Pea, Bean, Flax, Grain, Cabbage, Fruit Basket.
Weapon Cards: I’m not sure what I drew, but it wasn’t a sword, which would have been the only useful weapon card to my Viking actions this round.
I used eight of my remaining hacksilver from round 5 to buy a longship, which I now did as an anytime action.
Anytime action: buy a longship (-8 hacksilver).
3 Vikings: Exploration Board. I took Waterford. I drew an occupation card here. This might have been when I drew Homecomer, as I am beginning this round to plan for three 4 Viking actions in round 7, and know that I want to have enough occupation cards either to play or exchange for VP chips. Hence the 3 hits on the 3 Viking action space column.
3 Vikings: Build Longhouse (-1 stone due to Master Bricklayer). Normally, I wouldn’t do this, but I have been wanting to work on my house game–and, moreover, I have scads of food at this point. I drew an occupation card here, which was destined to be exchanged for a VP chip.
3 Vikings: Weekly Market (+3 Wool, +1 Fruit Basket). Another occupation card that became a VP chip.
2 Vikings: Pillaging, I placed an ore on my ship and, based on what I have in the end of the round picture, spent a stone here. But I must have had no swords. So I am guessing I rolled a 10 here, as this is when I took the other armor suit, covering ten squares.
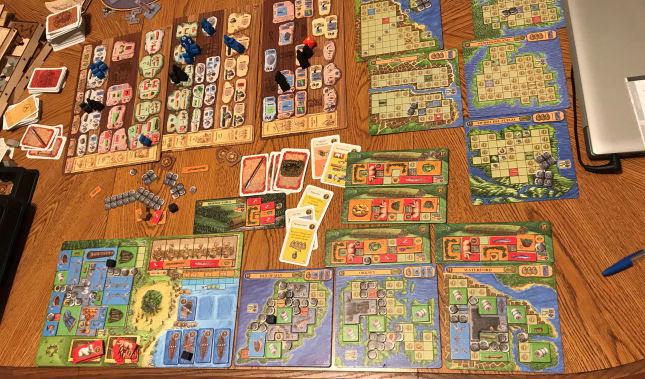
This is when I made my first use of the Farmer occupation card. By leaving the pregnant cow in the stable, I would make two cows, one from breeding and one from bonus, but this still left me with two cows to upgrade, action free, to jewelry tiles. Which I did. Placing those jewelry tiles, plus my bonus rune stone, oil barrel, and one remaining hacksilver from the previous round, I unlocked 7 income on my home board. This gave me 18 income. After placing the armor suit and three wool on Waterford, I had to place 9 hacksilver to unlock all of this island’s bonuses. I also placed one in my feast and one on my second longhouse, along with an herb, a pig, a cabbage, two mead horns, and a flax, to unlock all of its bonuses. This gave me 7 hacksilver going into round 7. During animal breeding, I flipped a sheep, and added a cow and a pig, and after bonuses from Orkney and Isle of Man, had 3 sheep (one pregnant), 6 pigs, and 3 cows. Total bonuses: 1 lumber, 2 stone, 1 ore, 2 mead horns, 1 rune stone, 1 grain, 1 pig, 1 cow, 1 weapon card, 2 oil barrels, two peas, two beans, 1 knarr, 1 longhouse, and the 10xblue tile from Norwegians. My tile collection going into round 7: 3 fruit baskets, 3 beans, 3 peas, two oil barrels, two mead horns, one rune stone, that big Norwegians blue tile, two grain, one herb. Also, notice my longhouse community and my harbor are growing due to Waterford’s bonuses.
Round 7:
Harvest: none.
Weapon cards: irrelevant, no risk actions.
So my strategy going into this round was to get my maximum oomph out of Homecomer. Homecomer lets you return one Viking on every 4 Viking action space, which means using it in round 7 is often your best play, if you can squeeze out three 4 Viking actions. Which I did.
4 Vikings: Build Knarr + Longhouse. This fills my harbor, and gives me my fourth longhouse, as well as a 4 VP chip.
4 Vikings: Weekly Market. +1 Spice, +1 Wool, +1 Hacksilver, +1 herb, +1 4-red meat. Plus another 4 VP chip.
4 Vikings: Mountain Strips, sweeping up four hacksilver and an ore from the end of a mountain strip, and double upgrading two fruit baskets to cloaks (nine-green tiles). While this only let me take three things from a mountain strip, rather than the full four, I took the extra hacksilver and ore for puzzling and points. This is when I played Homecomer, returning 3 vikings. I hate going to the Mountain Strips so late in the game, but can’t deny that it works well with a sheep strategy to double upgrade your growing pile of fruit baskets from the 3 Viking Weekly Market. Two cloaks is 18 points, which made this an 18 point play, or 4.5 points per Viking, plus a lot more if you count the next two actions due to my occupation card play. At this point, I had 12 hacksilver, 7 from the previous round plus 5 from viking actions this round.
1 Viking: Livestock Market, trading a sheep for a wool, a pelt, and a 4-red meat.
2 Vikings: Craft Ore >9, taking the helmet, and another 3 VP chip.
I turned my three remaining cows to jewelry, and placed two of them with the cloaks, the giant blue tile from Norwegians, the spice, my oil barrel and rune stone bonuses, and some of my remaining hacksilver and ore from the previous round, to finish my home board. Then I took my slew of food and filled my houses. The other jewelry, along with another oil barrel, another wool, and the pelt, went to Waterford. The helmet went to Isle of Man. The last wool went to Orkney. My income was 29, and after placing a couple on some -2 squares on Waterford and Isle of Man, I had 34 hacksilver remaining.
Ships 26
Emigrations —
Exploration boards 53
Sheds and Houses 75
Sheep and Cattle 10
Occupations 21
Silver 34
Home board —
Final income — (scored as silver, above. If you’re wondering why I didn’t score 29 points here, you’re scoring your Feast for Odin games wrong–see page 23 of the Feast for Odin rules, and Commonly Missed Rules in Feast for Odin.))
Exploration boards (negatives) -23
Sheds and houses (negatives) -4
Total 192.
Wait!!!! There’s an ore sitting with my unused loot. I could have had 193 if I tossed that on Waterford. This happens a lot to me. Don’t forget to place all your unused ore on your boards after the final round.


Z-Man Games Feast for Odin: The Norwegians Expansion

A Feast For Odin: Mini Expansion 1
Board of Life uses affiliate links.


